

Table of Contents
Introduction
Hello, there.
If you haven’t explored dependency injection in React Native or you’re curious about leveraging the Context API to manage dependencies effectively, you’ve come to the right place. Hope this will help you build more maintainable and testable apps.
In this guide, we’ll delve into the concepts of dependency injection, Context API and how they work together.
To bring these concepts to life, we’ll implement an analytics layer, showcasing the power of dependency injection with the Context API.
Quickly about Dependency Injection
Dependency injection is a technique that separates an object’s creation and its dependencies’ instantiation, allowing for greater flexibility and scalability in your app architecture.
By injecting dependencies into components rather than creating them inside the component itself, you can easily add/modify/remove dependencies without having to make significant changes to your codebase.
Using dependency injection in your React Native projects has several benefits, including:
- Improved testability: easily mock dependencies and test individual components in isolation
- Increased scalability: As your app grows, managing dependencies manually can become a nightmare. With dependency injection, you can easily modify or replace dependencies as needed.
- Enhanced maintainability: By keeping your dependencies separate from your components, you can improve the modularity of your codebase. This makes it easier to fix bugs, make updates, and add new features.
Usually, the dependencies are services: a layer of abstraction between the data layers and a consumer component (usually user interface components). They encapsulate business logic, data processing or other computations.
This technique can be applied to many different areas of your React Native app: analytics, API calls, Navigation or User authentication.
In this posts we’ll be tackling analytics.
Quickly about React Context API
React Context API is a tool for managing state across components in a React application. It allows you to pass data through the component tree without having to pass props down manually through each level.
The basic pattern here is: there is a Provider that manages the state, and “provides” it to a Consumer.
React Context API works seamlessly with dependency injection because it covers every part of a good dependency management approach:
– creates a centralized location where data can be accessed by any component – Provider
– any dependency is injected automatically in the Consumer components
Starting from left to right, from “outside” to “inside” of the components chain.
1. Create IAnalyticsService, an interface that will be the blueprint of our AnalyticsService class
In the next section, we’ll walk through how to implement dependency injection using the Context API in your React Native projects.
Implementing Dependency Injection with Context API: analytics service layer
To illustrate this approach, let’s consider an example where we want to implement analytics in our React Native app.
*I won’t be recommending any analytics library here, as it’s not the purpose of this writing.
Here’s a diagram to illustrate what we’re got to implement:
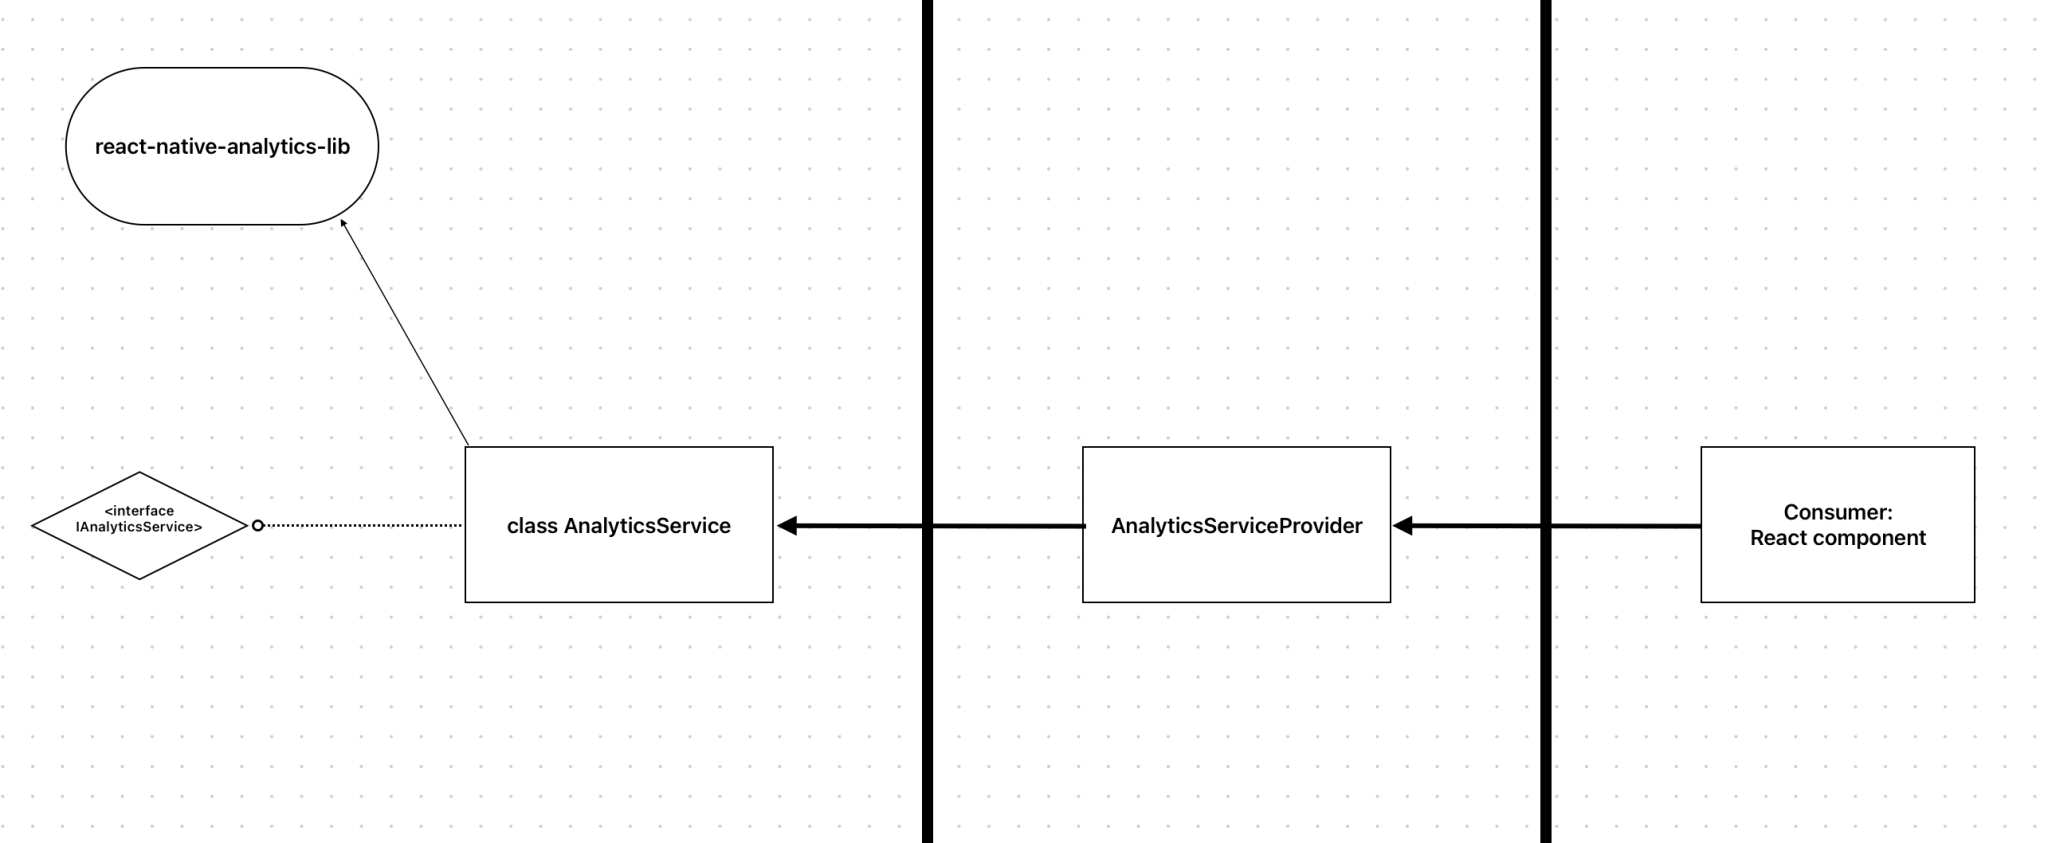
Starting from left to right, from “outside” to “inside” of the components chain.
1. Create IAnalyticsService, an interface that will be the blueprint of our AnalyticsService class
interface IAnalyticsService {
     trackScreen(name: string, data: DataObject): void
     trackAction(name: string, data: DataObject): void
}
2. Create AnalyticsService class, implementing IAnalyticsService
export class AnalyticsService implements IAnalyticsService {
     private analyticsLibraryClient: AnalyticsLibraryClient

     constructor(analyticsLibraryClient: AnalyticsLibraryClient) {
          this.analyticsLibraryClient = analyticsLibraryClient
     }

     public trackScreen(name: string, data: DataObject) { ... }

     public trackAction(name: string, data: DataObject) { ... }
}
3. Create AnalyticsServiceContext, where the context is defined – what will be injected. Also, create a custom hook that will be used by every consumer.
export interface IAnalyticsContextType {
    trackScreen(name: string, data: DataObject): void
    trackAction(name: string, data: DataObject): void
}

export const AnalyticsServiceContext = createContext<IAnalyticsContextType>({
    trackScreen: (name: string, data: DataObject) => ,
    trackAction: (name: string, data: DataObject) => ,
})

// define a hook to be used globally
export const useAnalytics = (): IAnalyticsContextType => useContext(AnalyticsServiceContext)
4. Create AnalyticsServiceProvider, the middleware that will forward the calls and apply business logic if needed. Also, here will reside the AnalyticsService instance
interface IAnalyticsServiceProps {
    children: React.ReactNode,
    analyticsLibraryClient: AnalyticsLibraryClient
}

export const AnalyticsServiceProvider = ({ children, analyticsLibraryClient }: IAnalyticsServiceProps) => {
    const analyticsServiceInstance = useMemo(
        () => new AnalyticsService(analyticsLibraryClient),
        [analyticsLibraryClient]
    )

    const trackScreen = useCallback((name: string, data: DataObject): void => {
            // apply business logic if needed
            analyticsServiceInstance.trackScreen(name, data)
        },
      [analyticsServiceInstance],
    )

    const trackAction = useCallback((name: string, data: DataObject): void => {
            // apply business logic if needed
            analyticsServiceInstance.trackAction(name, data)
          },
          [analyticsServiceInstance],
    )

    const value: IAnalyticsContextType = useMemo(() => ({
            trackScreen,
            trackAction
        }),
        [trackScreen, trackAction]
    )

    return (<AnalyticsServiceContext.Provider value={value}>
                {children}
            </AnalyticsServiceContext.Provider>
    )
}
It’s understandable if you see a lot of duplication. It’s ok. Having this approach we will gain extra points in terms of scalability:
– consumer components and the analytics provider won’t care if we modify/change the “react-native-analytics-lib”
– consumer components and the analytics provider won’t care if we add other analytics libraries
– consumer components won’t have to create an instance every time when needed
Now, tie everything together and make it work:
const App = () => {
    return (
        <AnalyticsServiceProvider analyticsLibraryClient={new AnalyticsLibraryClient()}/>
            <RootComponent>
        </AnalyticsServiceProvider>
    )
}

const RootComponent = () => {
    const analytics = useAnalytics()

    const goAction = () => {
        analytics.trackAction("go", );
    };

    return (
        <Pressable onPress={goAction}>
          <Text>Let's Go!</Text>
        </Pressable>
    );
}
Tips and Tricks
As a conclusion, let’s discuss about some tips&tricks for using this technique effectively in your React Native projects to increase your quality of life.
– Identify dependencies early: As you’re building your app, it’s essential to identify dependencies and plan for how they’ll be managed. In real life, there are dependencies that use other dependencies (e.g. authentication services that use keychain services).
– Keep the provider at the top level: This way, you can easily pass dependencies down to any component that needs them.
– Use mock data for testing: When testing components that use dependencies, it’s essential to mock data/libraries/services, and not the Provider/Context.
– Experiment and iterate: Dependency injection is a powerful technique that can significantly improve the scalability and maintainability of your React Native apps. However, don’t be afraid to try new things and make changes as needed.
Follow me
If you enjoy what I write, please follow my activity wherever you prefer: Dev.to, Medium or on my very own blogstatic powered blog calincrist.com.
Follow me on Twitter if you want to have a chat or simply see what I’m up to. I try to post something there every day.
Thank you for reading! If you enjoyed this post and want to explore topics like this, don’t forget to subscribe to the newsletter. You’ll get the latest blog posts delivered directly to your inbox. Follow me on LinkedIn and Twitter/X. Your journey doesn’t have to end here. Subscribe, follow, and let’s take continue the conversation. This is the way!