

Table of Contents
Introduction
Hello, there.
This article goes through setting up a CI/CD pipeline for an SPM package, leveraging Fastlane, SwiftLint and SonarQube. We address the challenge of maintaining a secure, private development environment on GitLab, while ensuring the package's public availability via GitHub.
Prerequisites:
It is assumed that you are at least somewhat familiar with SPM, Fastlane, Gitlab CI, Github and SonarQube.
Of course, every tool could be replaced by anything else (e.g. Gitlab by Github, SonarQube by SonarCloud) and the approach still stands.
This article focuses on the overall CI/CD strategy.
Setup on Gitlab
Starting your project in a private repository - here Gitlab - ensures that your code and sensitive tokens/data remains secure. In bigger companies or ones that have a security focus, it is a usual thing to host private instances of repositories for internal usage.
GitLab offers robust CI/CD tools out of the box, allowing developers to define workflows in .gitlab-ci.yml files.
If you’re not familiar with Gitlab CI/CD, check out their documentation . Pretty easy to setup.
Automating with Fastlane
Fastlane is a powerful tool for automating numerous iOS development tasks, from running tests to deploying your app. Fastlane is prefered for a lot of good reasons:
- intended for mobile development already
- it’s much easier for scripting (vs. writing bash scripts)
- no CI/CD vendor lock-in
- it’s easier to migrate from one CI/CD solution to another
SonarQube for Code Analysis
SonarQube is a tool for continuous inspection of code quality. Integrating it in your pipeline means setting up a SonarQube server and configuring the project to send reports. Usually, the configuration involves specifying run arguments either in a sonar.project.properties file, either directly when using the sonar command.
Designing the CI/CD pipeline
The task at hand is to construct a robust CI/CD pipeline that includes:
- checking out the repository
- linting
- automated testing
- code analysis
- publishing to public github repo
Pipeline design
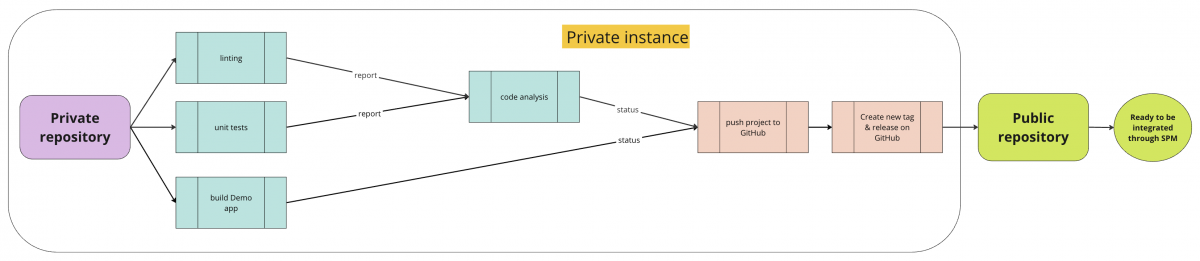
This pipeline ensures that the SPM package is not only functional and adheres to the highest standards of code quality, but also takes care of the automated publishing.
The proposed design starts 3 processes in parallel:
- linting - on success, exports a lint report
- unit-testing - on success, exports a result report
- builds the example app
When these processes finish with a success status, then the pipeline waits for the Sonar code analysis to finish. After it passes as well, then we are sure it’s safe to push to the public repository and create a new release.
Building the CI/CD pipeline
Linting
From my point of view, every project pipeline has to integrate a linting tool, to enforce the coding style and conventions agreed upon by the team. Being a swift project, Swiftlint is used to do just that.
Integrating SwiftLint into our CI/CD pipeline means that every commit is automatically checked for style violations, ensuring our codebase remains clean and maintainable.
Check here the Swiftlint documentation.
A typical Fastlane lane to automate SPM package linting, might look like this:
desc "Running SwiftLint"
lane :lint do

  sh "mkdir -p sonar-reports"

  output_file = "./fastlane/sonar-reports/swiftlint.json"
  config_file = "./.swiftlint.yml"

  swiftlint(
    mode: :lint, # SwiftLint mode: :lint (default) or :autocorrect
    output_file: output_file, # The path of the output file (optional)
    config_file: config_file, # The path of the configuration file (optional)
    ignore_exit_status: true, # Allow fastlane to continue even if SwiftLint returns a non-zero exit status
    reporter: "json" # Output reporter - json can be imported into SonarQube
  )
end
This step creates a directory called “sonar-reports” and export linting results, because they will be used later.
Testing
In this use-case, the testing lane might look like this:
desc "Running unit tests"
lane :tests do

  sh("rm", "-rf", "test_output")

  scheme = "iOSLibPackage"
  result_path = "fastlane/test_output/iOSLibPackage.xcresult"
  devices = ["iPhone 14 Pro"]

  scan(
    package_path: ".", # This makes swift package testing possible without a pbxproj or xcworkspace file
    scheme: scheme,
    devices: devices,
    code_coverage: true,
    result_bundle_path: result_path,
    skip_build: false
  )
end
This step creates a directory called “test_output” that will contain the results file.
Also, in this scenario the debug build is not skipped as the pipeline should verify the SPM build too.
SonarQube
To integrate SonarQube analysis within your Fastlane automation, you can add a step in your lane to run the SonarQube scanner. This requires having the SonarQube scanner CLI installed and configured on your CI machine or local environment.
This is the TLDR version of this step. Scroll down for a break down of this function.
desc "SonarQube scan"
lane :sonarqube do |options|
  # 1.
  token = ENV['SONAR_AUTH_TOKEN']
  UI.user_error!("You should pass auth token via env variable SONAR_AUTH_TOKEN") if token.nil?

  # 2.
  # install xcresultparser to parse the xcresult and get the test coverage
  # https://github.com/a7ex/xcresultparser
  sh "brew tap a7ex/homebrew-formulae"
  sh "brew install xcresultparser"

  # Create an xml file in generic code coverage xml format
  sh "mkdir -p sonar-reports"
  sh "xcresultparser -c -o xml ./test_output/iOSLibPackage.xcresult > ./sonar-reports/coverage.xml"

  # 3.
  if options[:pull_request_key].nil? || options[:pull_request_key].empty?
    branch_name = options[:branch_name]
  else
    pull_request_branch = options[:branch_name]
    pull_request_base = options[:pull_request_base]
    pull_request_key = options[:pull_request_key]
  end

  # 4.
  sonar_url = "https://sonarurl.com/",
  sonar_args = "-Dsonar.qualitygate.wait=true "
  + "-Dsonar.qualitygate.timeout=360 "
  + "-Dsonar.cfamily.build-wrapper-output.bypass=true "
  + "-Dsonar.swift.coverage.reportPaths=fastlane/sonar-reports/coverage.xml "
  + "-Dsonar.swift.swiftLint.report=fastlane/sonar-reports/swiftlint.json"

  # get the version from your versioning system (a file, project, environment, etc.)
  version = "x.y.z"

  # 5.
  sonar(
      project_key: "com.lib.package",
      project_name: "ios-lib",
      project_version: version,
      sources_path: "Sources",
      sonar_login: token,
      branch_name: branch_name,
      pull_request_key: pull_request_key,
      pull_request_base: pull_request_base,
      pull_request_branch: pull_request_branch,
      sonar_url: sonar_url,
      sonar_runner_args: sonar_args
  )
end
#1
First of all, we want to make sure that our CI/CD pipeline is configured properly, so we verify for the sonar auth token. It is usually set in the environment of the pipeline instance.
#2
Then we want to feed the test results into sonar - more specifically, the code coverage report. But it has to be done in a specific format - Cobertura format.
For “normal” iOS projects, this is done using slather fastlane action.
slather(
  build_directory: "foo",
  input_format: "bah",
  scheme: "MyScheme",
  proj: "MyProject.xcodeproj"
)
But since SPM projects do not have a xcodeproj file (and shouldn’t), this step needs a workaround.
And this workaround makes use of xcresultparser. What it does is parsing the binary xcresult bundle and interpret in different formats.
#3
The third part of the function is not necessary, but it’s very helpful. Specifying the current branch and if it’s a pull request or not enriches the SonarQube’s reports by being more granular.
Basically, each developer can see what’s the project’s status for each branch, PR.
#5
Lastly, this step runs the actual “sonar” command by specifing the needed arguments and configuration attributes.
The arguments I want to emphasize are the paths for the reports generated earlier: for linting and testing.
After SonarQube’s scanner processes everything, it will fail with a quality gate error (e.g. testing code coverage under the set threshold) or it will succeed.
Release to Github
The last step of the private pipeline: push the private repository contents to a public Github repository and create a tag and a release. Basically, syncronising the private repository to the public one and deliver the latest version for the swift package.
The plan is to:
- create a directory outside of the current private repository
- checkout the existing public repository
- delete the existing files from the checked out repository
- copy the project from the private to public repository
- commit the changes
- create a tag
- push to the public repository
- create a Github release
Checkout the part 2 of this story, where I describe how to sync the private repository to the public Github repository.
“A Step-by-Step Guide to Syncing Your Private Repository to Public for SPM Library Release”
See you there!
Conclusion
The journey of implementing and maintaining a CI/CD pipeline for a SPM package, particularly with a dual-repository strategy, is ongoing and evolves with the project's needs. But most important, it evolves with the team’s needs.
Thank you for reading! If you enjoyed this post and want to explore topics like this, don’t forget to subscribe to the newsletter. You’ll get the latest blog posts delivered directly to your inbox. Follow me on LinkedIn and Twitter/X. Your journey doesn’t have to end here. Subscribe, follow, and let’s take continue the conversation. This is the way!