

Hello, there.
This is how I learned to implement an equivalent of onChange in SwiftUI controls to update other @State variables.
Almost a year after SwiftUI was released, I decided to give it a go. I started to get my hands dirty by implementing basic UI controls (like Slider or TextField) and learning how to manipulate view states.
I quickly faced the challenge of updating an @State variable based on another @State variable’s changes.
And, yes, the property observers that we know (like didSet or willSet) don't work in @State variables.
After some research (which took longer than I expected), I learned three ways to do that:
- UI Controls’ specific callbacks:
onEditingChanged. - Binding variables.
- Making use of the
<a href="https://developer.apple.com/documentation/combine" data-href="https://developer.apple.com/documentation/combine" target="_blank">Combine</a>framework.
Below, I will describe a specific simple use case: Check if a TextField value is matching a predefined word and show that by toggling a switch on/off (the control is called Toggle).
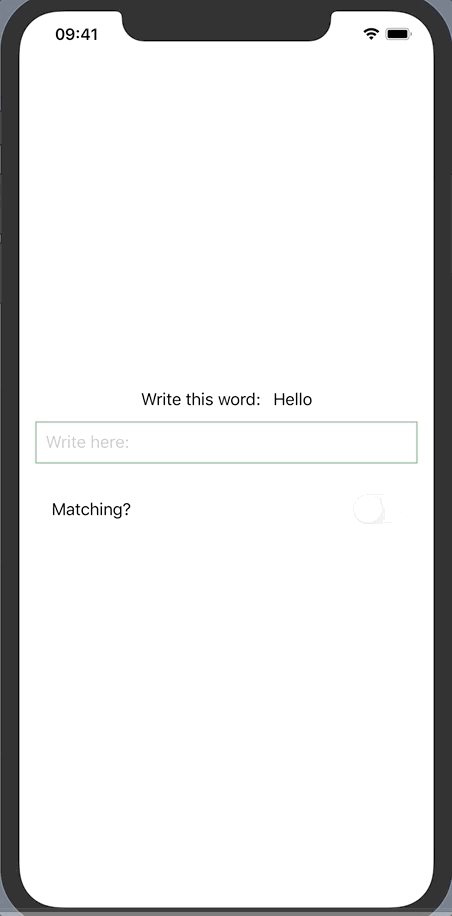
The UI skeleton code:
struct ContentView: View {
    @State var textValue: String = "Hello"
    @State var enteredTextValue: String = ""
    @State var textsMatch: Bool = false
    var body: some View {
          VStack {
              HStack {
                  Text("Write this word: ")
                  Text(textValue)
              }
              TextField("Write here:", text: $enteredTextValue)
                  .padding(10)
                  .border(Color.green, width: 1)
              Toggle(isOn: $textsMatch) {
                  Text("Matching?")
              }
              .disabled(true)
              .padding()
        }.padding()
    }
}
struct ContentView_Previews: PreviewProvider {
    static var previews: some View {
        ContentView()
    }
}
onEditingChanged
According to Apple’s Developer Documentation, this callback is available on the inits of three controls: TextField, Slider, and Stepper.
<span data-selectable-paragraph="">TextField:
init(_:text:onEditingChanged:onCommit:)</span><span data-selectable-paragraph="">Slider:
init(value:in:onEditingChanged:)</span><span data-selectable-paragraph="">Stepper:
init(_:onIncrement:onDecrement:onEditingChanged:)</span>
What we can do here is enhance the TextField’s init with this parameter:
@State var textValue: String = "Hello"
@State var enteredTextValue: String = ""
@State var textsMatch: Bool = false
//  ADD THIS
func checkIfTextsMatch(changed: Bool) {
    self.textsMatch = self.textValue == self.enteredTextValue
}
var body: some View {
  VStack {
      HStack {
          Text("Write this word: ")
          Text(textValue)
      }
      TextField("Write here:",
                text: $enteredTextValue,
                //  USE HERE
                onEditingChanged: self.checkIfTextsMatch)
      .padding(10)
      .border(Color.green, width: 1)
      Toggle(isOn: $textsMatch) {
          Text("Matching?")
      }
      .disabled(true)
      .padding()
  }.padding()
}
A possible downside to this approach is that onEditingChanged gets called after the user presses the return key of the keyboard.
But if you don’t want this to happen in real-time, it’s a viable solution.
Binding Variables
Binding is a property wrapper type that can read and write a value owned by a source of truth.
This reference enables the view to edit the state of any view that depends on this data.
We can use this to mimic the property observers from UIKit’s approach (getters/setters):
func checkIfTextsMatch() {
    self.textsMatch = self.textValue == self.enteredTextValue
}
var body: some View {
  let textValueBinding = Binding<String>(get: {
      self.enteredTextValue
  }, set: {
      self.enteredTextValue = $0
      self.checkIfTextsMatch()
  })
  return VStack {
      HStack {
          Text("Write this word: ")
          Text(String(textValue))
      }
      TextField("Write here:", text: textValueBinding)
          .padding(10)
          .border(Color.green, width: 1)
      Text(enteredTextValue)
      Toggle(isOn: $textsMatch) {
          Text("Matching?")
      }
      .disabled(true)
      .padding()
  }.padding()
}
I have to say that I don’t particularly like this method, as it doesn’t look clean to declare bindings and have business inside the rendering section.
Combine Framework
The Combine framework is used to customize the handling of asynchronous events by combining event-processing operators — in our case, to listen to state change events.
In Combine’s vocabulary, we have:
ObservableObject— A type of object with a publisher that emits before the object has changed.ObservedObject— Declares dependency on a reference type that conforms to theObservableObjectprotocol. It's a property wrapper type that subscribes to an observable object and invalidates a view whenever the observable object changes.Published— A type that publishes a property marked with an attribute.
This approach forces us (in a good way) to have a cleaner code by extracting the business logic out of the view.
Create the view model:
class ContentViewModel: ObservableObject {
    @Published var textValue: String = "Hello"
    @Published var enteredTextValue: String = "" {
        didSet {
            checkIfTextsMatch()
        }
    }
    @Published var textsMatch: Bool = false
    func checkIfTextsMatch() {
        self.textsMatch = textValue == enteredTextValue
    }
}
Use it in the desired view:
struct ContentView: View {
  @ObservedObject var viewModel = ContentViewModel()
  var body: some View {
      VStack {
          HStack {
              Text("Write this word: ")
              Text(String(viewModel.textValue))
          }
          TextField("Write here:", text:$viewModel.enteredTextValue)
              .padding(10)
              .border(Color.green, width: 1)
          Text(viewModel.enteredTextValue)
          Toggle(isOn: $viewModel.textsMatch) {
              Text("Matching?")
          }
          .disabled(true)
          .padding()
      }.padding()
  }
}
I don’t know about you, but I have to say that I much prefer the third option, as I have more control over the data flow and the code is more maintainable. And I need that in real-world use cases.
Thank you for reading! If you enjoyed this post and want to explore topics like this, don’t forget to subscribe to the newsletter. You’ll get the latest blog posts delivered directly to your inbox. Follow me on LinkedIn and Twitter/X. Your journey doesn’t have to end here. Subscribe, follow, and let’s take continue the conversation. This is the way!